Z1's Nissan Z Air-To-Air Intercooler Upgrade is the final step to take when upgrading the charge air cooling system in your Z. By adding two large intercoolers behind the front bumper you'll be able to run your car hard and trust that you'll be able to maintain consistency when it counts the most.
Why do I need it?
Nissan's factory charge air cooling system is made up of a single heat exchanger, a coolant pump, and two small water-to-air intercoolers. This system has proven to be insufficient for managing charge air temps under high-performance driving conditions, leading to a loss of engine performance as temperatures start to climb.
This occurs for many reasons: As charge air temperature increases, the density of the air entering the engine decreases. Lower air density means that less oxygen is available for combustion, which results in a loss of horsepower. Additionally, the engine management system responds to the increased temperature by gradually reducing both ignition timing and target boost pressure in an effort to reduce engine temperatures and protect the engine from detonation. Depending on how the engine calibration is configured, this protection typically begins to take effect when charge air temperatures exceed 140°F. We regularly see charge air temperatures up to 185°F on vehicles with stock intercooler systems when driven hard, resulting in a reduction of ignition timing of at least 2.5 degrees, and a loss of as much as 25whp or more just from the timing reduction. With the reduction in timing, combined with a reduction in boost target and overall less dense air, we've seen losses on the dyno as high as 75whp on stock intercooler systems. Upgrading the stock heat exchanger and coolant pump system can be helpful for cars that are occasionally driven hard on the street but don't see any track time. However, for cars that will see extensive high-performance driving including track time and racing, the Z1 air-to-air intercooler conversion kit is the only solution for keeping charge air temps under control, no matter what.
How do you fix it?
To remedy this situation, our engineering team focused on eliminating the stock water-to-air intercooler system in favor of much more efficient air-to-air intercoolers. Two custom intercoolers were designed to take up the space behind the front bumper. Cast end tanks allow us to maximize core area, exposing as much of the core as possible to cooler ambient air. Offset fins on the ambient side of the core allow for greater heat dissipation and more effective cooling of charge air, resulting in more consistent performance. A custom bash bar was designed to replace the factory crash bar and retains all factory features including radar sensor mount, ambient temp sensor mount, and tow hook location.
Black anodized mandrel bent charge piping directs air to and from the intercooler. To ensure piping stays as smooth as possible, custom tooling was developed to ensure the desired radius could be achieved without crushing piping. Wire-reinforced silicone couplers are used on the pressure side to prevent ballooning, which is critical in high-boost scenarios. To make sure that we put our best foot forward, we stuck with our long-standing philosophy of placing filters in the direct path of cold air in front of the core support to ensure the system is working efficiently from the moment air enters the piping. BOVs are placed directly in front of the throttle body, similar to the positioning on the GTR.
Testing Review
As with all Z1 products, our air-to-air intercooler went through rigorous testing on and off track to ensure it met Z1's strict performance standards. Countless track days allowed us to monitor and review charge air temperatures, and make necessary changes to ensure our air-to-air conversion met and exceeded expectations. Road course testing continues to be the most rigorous form of product validation for the Z since long periods of hard driving let us push the car well beyond the needs of the everyday customer. Testing on tracks like Road Atlanta and Atlanta Motorsports Park allowed us to run the car hard for upwards of 40 minutes with no breaks and demonstrated consistent charge air temperatures just above ambient with no noticeable loss in performance.
To illustrate what this looks like, we data-logged charge air temperatures on cars set up with three different charge air cooling systems. One being stock, and two with upgrades. We made multiple consecutive dyno pulls to build heat in the cooling system so we could watch how these three different setups performed.
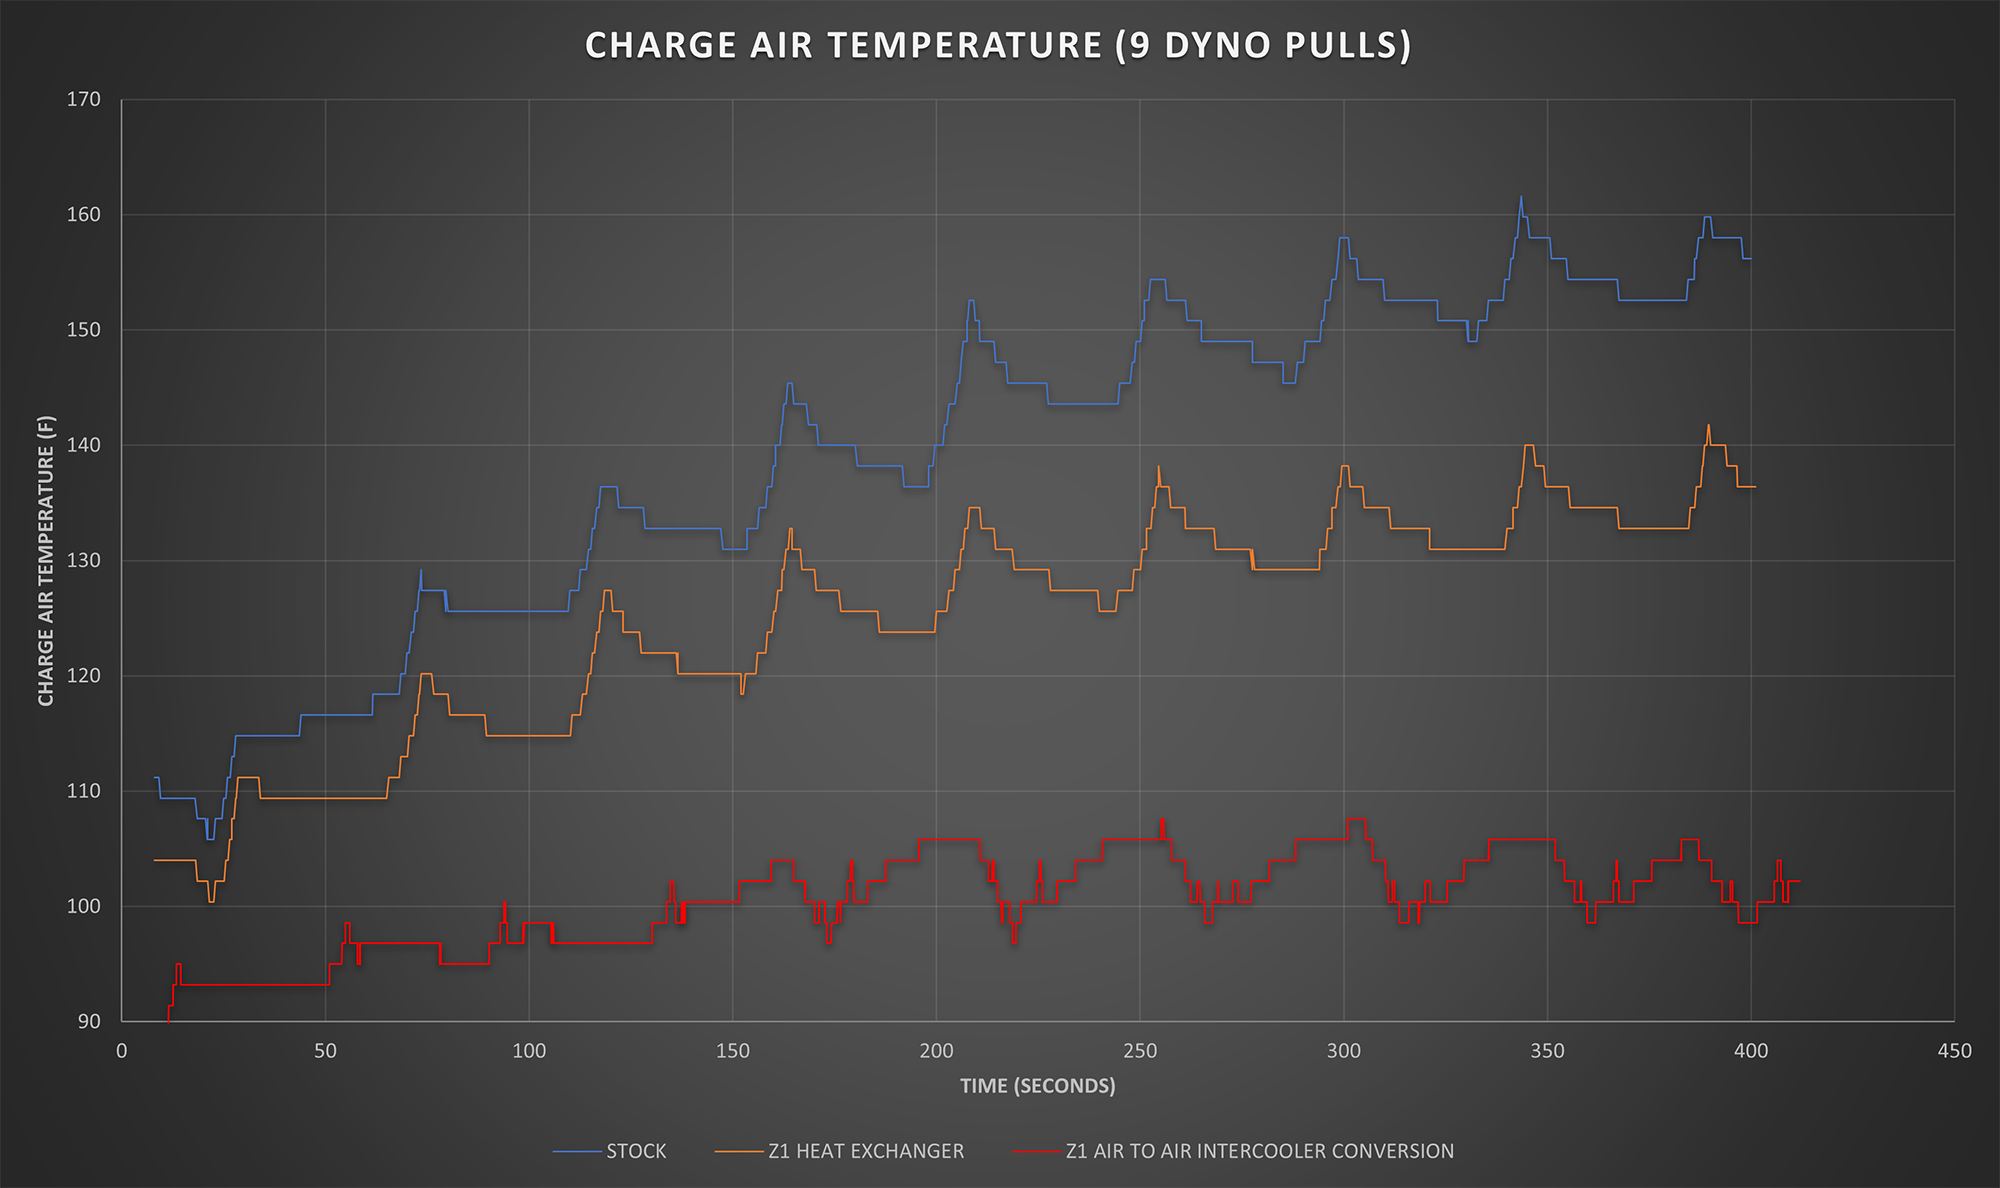
The data on the blue line was captured on a Z with a stock charge air cooling system. What we see on this line is a gradual increase in charge air temperatures reaching approximatley 160° by the final pull. If we continued making additional pulls, you'd see charge air temperatures continue to climb. As we explained earlier this begins to reach a point where the engine management system responds to the increased temperature by gradually reducing both ignition timing and target boost pressure in an effort to protect the engine from detonation.
The data on the orange line was captured on the same Z, this time equipped with Z1's heat exchanger. The trend is very similar, however, charge air temperatures are a great deal lower. As a result, this car will let us have fun a little while longer before performance takes a dive. We consider this to be a fair representation of the average enthusiast's modified car.
The red line at the bottom of the chart tells us a completely different story. This car is equipped with Z1's Air-To-Air Intercoolers, and as a result gives us two very obvious advantages; First, the charge air temperatures are significantly lower. Second, temperatures are stable and well below the threshold for intervention from the engine management system. This give us the confidence to send our cars out on track or for a fun drive on the street knowing that we'll have consistent, repeatable performance.
Installation
Installation is simple with a user-friendly guide. The only permanent modification required is a small trimming to the core support to open a path for the intakes. The factory washer tank must be removed to make room for the large intercoolers; however, we made a lower-profile aluminum washer tank that can be purchased in the product options. Z1 highly recommends purchasing a Boost Leak Test Kit to verify all connection points are tight, secure, and free of leaks. Boost leaks are the most common cause of power loss and tuning issues in forced induction cars.
Please know compatibility with the AMS Flex Fuel Kit has not been confirmed. It is likely that components in the flex fuel kit may need to be repositioned due to the placement of the charge piping.
Options
Turbo Type: Using this option select what model turbos you currently have on your Z. Please know that if you have VRX70B turbos, you MUST have aftermarket blow off valves, as the compressor housing of Z1 turbos do NOT accommodate factory BOVs. If your Z still has stock turbos, you may use the stock diverter valves if desired. We will include block-off plates for the piping if no BOVs are selected.
Blow Off Valves: Select whether or not your car already has BOVs, or purchase a set at a discounted price. This will include everything found in Z1's HKS or Turbosmart BOV kit minus silicone couplers.
Low-Profile Washer Tank: Choose to add a low-profile washer tank to your order. Please know that the stock washer tank will NOT fit with the front-mounted intercoolers and piping. If you'd like to keep a functioning windshield washer, you will need to select this option.
Details:
- Compatible with stock and aftermarket turbos
- Virtually no change in vehicle weight
- Includes High-Clearance Bash Bar
- Oil cooler remains in the same position as stock, so as to not reduce oil cooler performance
- Mandrel bent piping with wire-reinforced silicone on the pressure side
- Requires minimal cutting, keeping installation simple
- Includes custom serviceable dry media air filters
- Requires a re-tune after installation
- Not compatible with factory or aftermarket engine covers
Fits:
- 2023+ Nissan Z
- Does not fit NISMO models
*** This item does not qualify for any additional discounts or promotions *** |
 |